 |
Sunday, January 13, 2013

Thursday, November 3, 2011
Plumbing Lesson Three
I have a story and a tirade. We'll start with this: When in the hell did it become OK for step-by-step instructions to come with just illustrations? This is becoming more and more prevalent. I'm opposed.
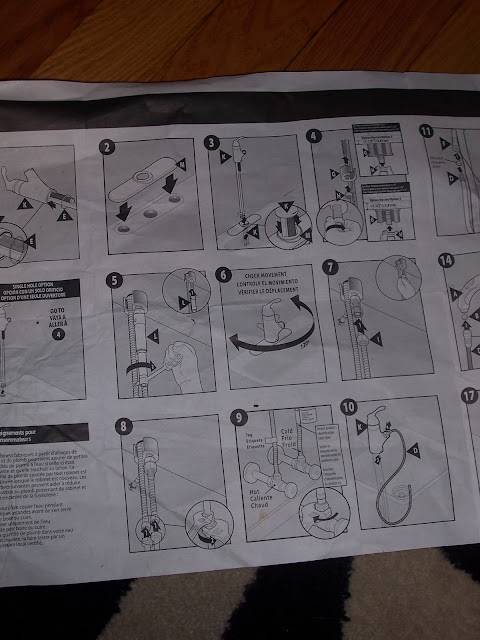
I had to replace the kitchen faucet, and while it's not too hard to figure out what to do, the instruction sheet looked like this: A whole bunch of letters, numbers and arrows, but no expository writing.
And in the words of Jules:
I know this instruction sheet is meant to appeal to a range of people, who are replacing their faucets in China, Sweden, Czech Republic and the United States and that printing directions in an assortment of languages would be expensive, but come on! Couldn't you at least put a well-worded step-by-step list in each language in a place where everyone on the planet could access it, like, I don't know, the WORLDWIDE Web? Please?
OK, so on to the story.
Plumbing Lesson #3: Know Your Holes
(Check out Plumbing Lessons One and Two.)
A few weeks ago, I was in my car, and the gearshifter popped off in my hand. I rigged it back together, but I could see smoke coming from the steering column, so I took my car to the mechanic. I didn't get to count that as a D-I-Y victory.
 A few days ago, though, the kitchen faucet handle popped off in my husband's hand. He knew I'd be delighted to fix it.
"I'm getting a Moen!" I said. Am I a sucker for their commercials? Yes.
On to the hardware store. Lots of faucets there.
Before you pick one, you have to know how many faucet holes you have in the sink. It might not be obvious. Go under the sink, look up and see how many there are. It's probably one, two, three or four. You'll need this information when you go shopping. You can cover extra holes, but you can't drill new holes, so you don't want to buy a three-hole setup if you only have room for one. I have four; the fourth is a soap dispenser.
 I wanted a faucet with a spray nozzle, and those range from about $100 to $300 or more. Despite my predisposition for Moen, I seriously considered a Delta faucet as well. Both of 'em looked about the same, and Delta also has an excellent commercial. But I grabbed the $148 Moen faucet, and headed to the checkout.
At home, I removed the old faucet without too much trouble. Cleaned the gunk from underneath. Popped the new faucet in place. I was delighted to discover that Moen had even included a special tool (Part L) that I would need to tighten Part H onto Part G. (I know they have real names in the plumbing world, but that's what the instruction sheet calls them.)
Then it went from Moen to moan. I went to attach the water-supply hoses to the water-supply line under the sink . . . and they didn't fit. I needed some kind of adapter. My excitement was waning. It was going so smooth! Until then. I was feeling awesome! Until then. I didn’t have to call my dad. Until then. He said, "It happens to the best of us."
I went back to the hardware store the next day (with my old plumbing parts in hand to match up the sizes) and found a 1/2" X 3/8" compression adapter. I needed two, and they were $4 each. It's not the cost that bugged me. It's the fact that I need to go back to the store. Too bad there was no indication on the box or directions that some homes would need an adapter. This is a lesson learned. When you do a project, it helps to bring your old parts to the store with you so you can get everything you need at once.
Back to the sink. Look, I fixed it!
I had to replace the kitchen faucet, and while it's not too hard to figure out what to do, the instruction sheet looked like this: A whole bunch of letters, numbers and arrows, but no expository writing.

And in the words of Jules:
I know this instruction sheet is meant to appeal to a range of people, who are replacing their faucets in China, Sweden, Czech Republic and the United States and that printing directions in an assortment of languages would be expensive, but come on! Couldn't you at least put a well-worded step-by-step list in each language in a place where everyone on the planet could access it, like, I don't know, the WORLDWIDE Web? Please?
OK, so on to the story.
Plumbing Lesson #3: Know Your Holes
(Check out Plumbing Lessons One and Two.)
A few weeks ago, I was in my car, and the gearshifter popped off in my hand. I rigged it back together, but I could see smoke coming from the steering column, so I took my car to the mechanic. I didn't get to count that as a D-I-Y victory.
 A few days ago, though, the kitchen faucet handle popped off in my husband's hand. He knew I'd be delighted to fix it.
 "I'm getting a Moen!" I said. Am I a sucker for their commercials? Yes.
On to the hardware store. Lots of faucets there.
Before you pick one, you have to know how many faucet holes you have in the sink. It might not be obvious. Go under the sink, look up and see how many there are. It's probably one, two, three or four. You'll need this information when you go shopping. You can cover extra holes, but you can't drill new holes, so you don't want to buy a three-hole setup if you only have room for one. I have four; the fourth is a soap dispenser.
 I wanted a faucet with a spray nozzle, and those range from about $100 to $300 or more. Despite my predisposition for Moen, I seriously considered a Delta faucet as well. Both of 'em looked about the same, and Delta also has an excellent commercial. But I grabbed the $148 Moen faucet, and headed to the checkout.
At home, I removed the old faucet without too much trouble. Cleaned the gunk from underneath. Popped the new faucet in place. I was delighted to discover that Moen had even included a special tool (Part L) that I would need to tighten Part H onto Part G. (I know they have real names in the plumbing world, but that's what the instruction sheet calls them.)
Then it went from Moen to moan. I went to attach the water-supply hoses to the water-supply line under the sink . . . and they didn't fit. I needed some kind of adapter. My excitement was waning. It was going so smooth! Until then. I was feeling awesome! Until then. I didn’t have to call my dad. Until then. He said, "It happens to the best of us."
I went back to the hardware store the next day (with my old plumbing parts in hand to match up the sizes) and found a 1/2" X 3/8" compression adapter. I needed two, and they were $4 each. It's not the cost that bugged me. It's the fact that I need to go back to the store. Too bad there was no indication on the box or directions that some homes would need an adapter. This is a lesson learned. When you do a project, it helps to bring your old parts to the store with you so you can get everything you need at once.
Back to the sink. Look, I fixed it!
 |
| I'm also the one who hemmed the curtains. Which are uneven. |
Friday, August 26, 2011
Patchwork Cadillac

I crashed my car, like an idiot, in stop-and-go traffic a few months ago.
 |
| Missing some teeth. |
"From 20 feet away, you won't be able to tell the difference," he estimated. I liked his honesty, and I could live with it.
I had to go to three junkyards over the course of this project. What's nice is that most junkyards have websites where you can search the inventory online. I found a headlight and cornering light assembly at Ryan's Northend Auto Parts in Oak Park for $75. It was a good deal. Then, Rick and I headed out to Parts Galore on Eight Mile near Gratiot in Detroit. It's enormous. You pay a buck to walk through the yard; even they don't know what they have. Bring your own tools, remove what you want and pay on your way out.
 |
| Taking shape. |
Two hours later, we popped the white hood on my blue Cadillac and replaced the headlight, then went out to celebrate my birthday with some wallyball and beer. Already, I was feeling better about my car.
 |
| That's Rick on the left, me in the center. |
But first, we had to wet sand the white hood with fine (400 grit) sandpaper to remove the gloss coat and prepare it for painting. Keep the surface wet, Rick said. Change the sand paper if it starts to get dirty. Use light strokes. Try to make "X" scratches.
 It was all going so well--until we ran out of paint. Tip: just spring for the quart, even if you think you need just a pint. The paint store was closed the rest of the weekend. So I had, like, stripes on the hood. And still no grille. I drove around like that for a week. But I'm classy, so I can pull that off. When we got more paint, we had to resand the hood and repaint it. (I think the paint and clearcoat cost around $150, but at this point, I just gave Rick a few hundreds and a bunch of $20s and told him to keep the change.)
After painting, Rick had the painstaking job of fixing the hood-release latch. And I had to find a grille. I went to U.S. Auto Supply in Detroit, where they had the grille for $45. Deal.
I was just a few bolts away from calling this job done.
When we got that grille attached and closed the hood, I stepped back, 20 feet away. Rick was right. I'm happy.
The best reactions came from two guys I work with. The intern noticed I'd been parking in the visitor's lot, oh, and that my car was crushed. He asked me about it, but I made him swear to secrecy. A few weeks later, when I pulled in to the employee garage, he did a double-take, and his jaw dropped. I drove by and gave him a thumbs-up. Job well done. Another editor was seen eyeing my finished car, wondering aloud if it was the same one that had been in the visitor's lot. Yup.
We did good.
I can't undo the damage. But I did what I could to make it better. And all for about $350 (before Ricky's take).
Before:

And after:

Thursday, June 16, 2011
Handy, man
 |
| The HandyBand magnetic wristband will hold a wrench, screws and a socket. |
I got a job at AutoWeek, and we ran a Father's Day gift guide with car-related things (like a Ferrari leather iPad case), obnoxious items (like a $70 pair of nail clippers) and something really cool, the Handy Band for $10. I bought five of them.
From the Why Didn't I Think of That files, it's a magnetic wristband that holds wrenches, screws, nuts, sockets, etc., so you can use both hands for working and you don't have to get up and down the ladder 100 times.
I bought one for myself and every one of my brothers who is a mechanic.
I made a goofy video showing the kinds of things it will grab for you. It did pick up scissors, but I would not use it to hold them. They might fall off and you could get hurt.
This would be ideal for when you're working on a car where you have to remove so many nuts and bolts.
It would be nice if the Handy Band had a pencil holder too. But I guess that's what ears and teeth are for. Also, the Handy Band can pinch your skin a little. So wear a wristband or long sleeves underneath.
I'm giving a Handy Band to my dad for Father's Day. I asked him what he would say if I got him a set of nail clippers that cost $70. He said I wouldn't be any daughter of his. Save money, get this $10 gift instead.
You can order the Handy Band at www.handy-band.com.
Monday, March 22, 2010
Tall Tales of Two Contractors
I saved $15,000 last week. Woo-hoo!
I went to a home expo with a few projects in mind, but the most pressing issue was my home's foundation. I don't want it to crumble down.
The laundry room is by far the ugliest in my house. The paint on the walls is peeling off and the concrete underneath has white powder flaking off. I took it as a sign of water damage, explained the symptoms to two contractors and set appointments for them to give free inspections and estimates.
The first guy had a faux hawk, but I still tried to give him a fair shake. He walked around making noise like, "ooohhh," "tsk, tsk," and other things to imply he was horrified. He sat down to give us the bad news. He showed diagrams and talked about escavating the basement, tearing out the driveway and porch. He really dragged it out. The cost would be $26,000. "The good news," he said, "is you don't need that. Not yet." All right, buddy, enough with the scare tactics!
He gave another option, the quick fix that the "other guys" would do. At a "cheap" $5,600 it would be tempting, but it won't work and he doesn't recommend it. Option 3 was $15,000, but he would give us a $2,000 break if we were ready to get started today. And, it involved tearing up the house. Uh, no.
Two days later, I had another contractor come out. "How long have you had water in the basement," he asked. "We don't," I said. "I'm starting to think this was blown out of proportion." He took a look at the laundry room and said I was right. He recommended a mold-killing fogger and said I should paint the basement. Spend your money on something else, he said.
How could it be that two contractors have two very different reactions? Could it be one was a liar?
Do you ever feel like you're being taken advantage of? Or maybe you need some tips on how to talk to contractors so you know you're getting the best service.
At the home show, I met a man named Dan Nichols, who put together a DVD-set called "Armed Consumer." He talked to 23 contractors in 17 different industries — such as plumbing, electrical and roofing — about what dishonest contractors don't want you to know. Nichols, who spent three years buying and flipping houses, learned some of these lessons the hard way.
Here, he explains more about it:
Each topic is divided into a chapter, so it is a material that can be referenced any time you need professional work done in your home. The DVD sells for $19.95 at his Web site armedconsumer.com. I haven't purchased it yet, so I can't give a thumbs up or thumbs down, but hey, I just saved $15,000, so I may as well. I'll let you know what I think.
In the meantime, remember, don't be bullied or fall for hard-sell tactics. Get a second opinion, or a third, and sleep on it.
I went to a home expo with a few projects in mind, but the most pressing issue was my home's foundation. I don't want it to crumble down.
The laundry room is by far the ugliest in my house. The paint on the walls is peeling off and the concrete underneath has white powder flaking off. I took it as a sign of water damage, explained the symptoms to two contractors and set appointments for them to give free inspections and estimates.
The first guy had a faux hawk, but I still tried to give him a fair shake. He walked around making noise like, "ooohhh," "tsk, tsk," and other things to imply he was horrified. He sat down to give us the bad news. He showed diagrams and talked about escavating the basement, tearing out the driveway and porch. He really dragged it out. The cost would be $26,000. "The good news," he said, "is you don't need that. Not yet." All right, buddy, enough with the scare tactics!
He gave another option, the quick fix that the "other guys" would do. At a "cheap" $5,600 it would be tempting, but it won't work and he doesn't recommend it. Option 3 was $15,000, but he would give us a $2,000 break if we were ready to get started today. And, it involved tearing up the house. Uh, no.
Two days later, I had another contractor come out. "How long have you had water in the basement," he asked. "We don't," I said. "I'm starting to think this was blown out of proportion." He took a look at the laundry room and said I was right. He recommended a mold-killing fogger and said I should paint the basement. Spend your money on something else, he said.
How could it be that two contractors have two very different reactions? Could it be one was a liar?
Do you ever feel like you're being taken advantage of? Or maybe you need some tips on how to talk to contractors so you know you're getting the best service.
At the home show, I met a man named Dan Nichols, who put together a DVD-set called "Armed Consumer." He talked to 23 contractors in 17 different industries — such as plumbing, electrical and roofing — about what dishonest contractors don't want you to know. Nichols, who spent three years buying and flipping houses, learned some of these lessons the hard way.
Here, he explains more about it:
Each topic is divided into a chapter, so it is a material that can be referenced any time you need professional work done in your home. The DVD sells for $19.95 at his Web site armedconsumer.com. I haven't purchased it yet, so I can't give a thumbs up or thumbs down, but hey, I just saved $15,000, so I may as well. I'll let you know what I think.
In the meantime, remember, don't be bullied or fall for hard-sell tactics. Get a second opinion, or a third, and sleep on it.
Thursday, March 11, 2010
Attic conversion
Bungalow, bungalow.
I live in a bungalow.
At first, I thought that was a fun word for a cool type of house. That was before I realized it was synonymous with "small." I was especially excited about having two walk-in attics on either side of my "master" bedroom.
Now, I wonder what it would be like to have a real master bedroom instead. That would entail taking out the attics and converting the upstairs to a much larger, usable space.
According to a link on the Berkley Home Show Web site, http://www.berkleyhomeshow.com, the return on investment for such a project is 77 percent. (Of course that assumes that a house is an investment...)
But how much would it cost to convert the attic, add a dormer or just turn one of the attics into a well-lit closet?
You can find out much more information on home improvements, renovations, decorating, financing and landscaping at the Berkley Home Show this weekend in Berkley, Michigan.
Sixty vendors have signed up for the event. It runs 10 a.m. to 4 p.m. Saturday, March 13 at
I live in a bungalow.
At first, I thought that was a fun word for a cool type of house. That was before I realized it was synonymous with "small." I was especially excited about having two walk-in attics on either side of my "master" bedroom.
Now, I wonder what it would be like to have a real master bedroom instead. That would entail taking out the attics and converting the upstairs to a much larger, usable space.
According to a link on the Berkley Home Show Web site, http://www.berkleyhomeshow.com, the return on investment for such a project is 77 percent. (Of course that assumes that a house is an investment...)
But how much would it cost to convert the attic, add a dormer or just turn one of the attics into a well-lit closet?
You can find out much more information on home improvements, renovations, decorating, financing and landscaping at the Berkley Home Show this weekend in Berkley, Michigan.
Sixty vendors have signed up for the event. It runs 10 a.m. to 4 p.m. Saturday, March 13 at
Berkley High School, 2325 Catalpa, Berkley, MI 48072. It's free, AND you can get free advice.
At an Ask the Architect booth, homeowners can present photos, home mortgage surveys, etc. and get no-obligation feedback.
I'm going.
Wednesday, March 3, 2010
Gee, thanks dad! A broken hanger.
Christmas in my family is about people, not presents. So when I saw a gift marked to me from my dad, I was surprised. I unwrapped the small package.
"It's a broken hanger," I said with a big smile. I'm a good daughter.
"What could you do with a broken hanger?" my dad asked. He hasn't thrown away anything since 1983.
Not missing a beat, my brother Ken chimed in, "Hang up half a shirt."
I didn't know what to say. Still smiling.
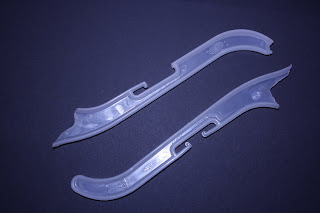
Dad explained that I could use the hanger as push sticks to help move small pieces of wood across the table saw I recently acquired. It was starting to make sense. My dad had even cut notches in the hanger pieces to fit different sizes of wood.
You can always buy or make bigger and better table saw accessories, but here is a smart idea that cost zero bucks.
As I held the pieces of a broken hanger, I was sincerely thankful because my dad is looking out for my safety. He wants to keep my fingers out of harm's way.
"It's the gift that keeps on giving," I said. "That's right," he said.
Be careful out there!
"It's a broken hanger," I said with a big smile. I'm a good daughter.

"What could you do with a broken hanger?" my dad asked. He hasn't thrown away anything since 1983.
Not missing a beat, my brother Ken chimed in, "Hang up half a shirt."
I didn't know what to say. Still smiling.
Dad explained that I could use the hanger as push sticks to help move small pieces of wood across the table saw I recently acquired. It was starting to make sense. My dad had even cut notches in the hanger pieces to fit different sizes of wood.
You can always buy or make bigger and better table saw accessories, but here is a smart idea that cost zero bucks.
As I held the pieces of a broken hanger, I was sincerely thankful because my dad is looking out for my safety. He wants to keep my fingers out of harm's way.
"It's the gift that keeps on giving," I said. "That's right," he said.
Be careful out there!
Monday, March 1, 2010
Mop conspiracy
It's March 1, and I have begun my spring cleaning because I'm not going to waste any time this year.
Today, I mopped the basement floor, several times, which brings me to my one and only pet peeve. Mops. I have maybe six sponge mops in the basement because every time I need to mop, I buy a new mop. I can never find the correct sponge head to match the existing mop I have, so I just buy a new mop. It's not like all Quickie mop heads are interchangeable with Quickie mops or Ocello mop heads with Ocello mops. You have to know you need model FG1268, and that is annoying!
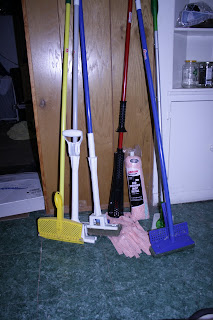
One time I sent my husband to the store for a mop and asked him to buy a few replacement sponges all at the same time so we could be sure they match. He came home with a mop and mop heads -- the same brand, bought at the same time from the same supermarket -- but they're incompatible. Incomprehensible! Of course I couldn't blame him, I blame the mop companies and their conspiracy to get us to waste money on mops.
I've had it with sponge mops. I bought a Libman Wonder Mop (and a replacement head). So far, it has worked OK. It says you can just detach the mop head, throw it in the wash and reuse it up to 50 times.
I know a mop isn't a tool in the sense that a wrench or drill is, but everyone needs a mop, and I'm hoping I'm done shopping for them for a while.
Let's talk spring cleaning: What is your spring cleaning routine? Do you have any cleaning questions? Maybe I can find some answers for an upcoming post. Comment below.
Today, I mopped the basement floor, several times, which brings me to my one and only pet peeve. Mops. I have maybe six sponge mops in the basement because every time I need to mop, I buy a new mop. I can never find the correct sponge head to match the existing mop I have, so I just buy a new mop. It's not like all Quickie mop heads are interchangeable with Quickie mops or Ocello mop heads with Ocello mops. You have to know you need model FG1268, and that is annoying!

One time I sent my husband to the store for a mop and asked him to buy a few replacement sponges all at the same time so we could be sure they match. He came home with a mop and mop heads -- the same brand, bought at the same time from the same supermarket -- but they're incompatible. Incomprehensible! Of course I couldn't blame him, I blame the mop companies and their conspiracy to get us to waste money on mops.
I've had it with sponge mops. I bought a Libman Wonder Mop (and a replacement head). So far, it has worked OK. It says you can just detach the mop head, throw it in the wash and reuse it up to 50 times.
I know a mop isn't a tool in the sense that a wrench or drill is, but everyone needs a mop, and I'm hoping I'm done shopping for them for a while.
Let's talk spring cleaning: What is your spring cleaning routine? Do you have any cleaning questions? Maybe I can find some answers for an upcoming post. Comment below.
Wednesday, February 24, 2010
Hot for insulation
Never before in the history of Consumers Energy has a gas bill been so eagerly anticipated -- or so well received.
Today, I tore into the mail to find out the results of my window insulation experiment. In January, I spent $13 installing shrinkwrap insulating kits on four windows in an effort to cut my $184.88 gas bill.
Hot damn, I saved $50! This month's bill is $136.66. When you subtract the cost of the window insulating kits, I saved a grand total of $35.22 -- and that's just in one month. Imagine if I had actually done this in November! Or insulated more windows!
I did some calculations. February's billing cycle was warmer on average than January's billing cycle, by 3.8 degrees per day, so some savings could be expected. However, I also looked at my January 2009 heating bill ($187.70), compared to my February 2009 bill ($171.86) -- a difference of about $16. So to save $50 in one billing cycle is significant.
Our home is more comfortable as well. Instead of shivering under a blanket, I'm wearing a tank top as I type this.
The bottom line is, yes, those plastic shrinkwrap kits are worth the time and money it takes to install them. I'm going to do this every year from now on -- and I'll do it early in the season so I can enjoy a warm home all winter long.
Today, I tore into the mail to find out the results of my window insulation experiment. In January, I spent $13 installing shrinkwrap insulating kits on four windows in an effort to cut my $184.88 gas bill.
Hot damn, I saved $50! This month's bill is $136.66. When you subtract the cost of the window insulating kits, I saved a grand total of $35.22 -- and that's just in one month. Imagine if I had actually done this in November! Or insulated more windows!
I did some calculations. February's billing cycle was warmer on average than January's billing cycle, by 3.8 degrees per day, so some savings could be expected. However, I also looked at my January 2009 heating bill ($187.70), compared to my February 2009 bill ($171.86) -- a difference of about $16. So to save $50 in one billing cycle is significant.
Our home is more comfortable as well. Instead of shivering under a blanket, I'm wearing a tank top as I type this.
The bottom line is, yes, those plastic shrinkwrap kits are worth the time and money it takes to install them. I'm going to do this every year from now on -- and I'll do it early in the season so I can enjoy a warm home all winter long.
Tuesday, February 16, 2010
Cold shoulder
The pitfalls of DIY are many. Procrastination, cutting corners, having only yourself to blame.
My shrinkwrap window insulating is falling down on me. They're wrinkling. The tape is not attached to the window sill. They're letting cold air in. I still haven't gotten my heating bill yet, so it's too soon to tell whether I've saved any money, but at this rate, it's not looking good.
I would try to reattach them, but the packages really skimp on tape. I think my downfall was that I didn't attach the tape properly. Oh well, it'll be March before we know it.
My shrinkwrap window insulating is falling down on me. They're wrinkling. The tape is not attached to the window sill. They're letting cold air in. I still haven't gotten my heating bill yet, so it's too soon to tell whether I've saved any money, but at this rate, it's not looking good.
I would try to reattach them, but the packages really skimp on tape. I think my downfall was that I didn't attach the tape properly. Oh well, it'll be March before we know it.
Sunday, February 7, 2010
Orange power!
Say hello to my little friend.

The Black & Decker Electromate 400 is an AC/DC portable power supply, jump starter and air compressor in one. And, it has a spotlight.
I'm not shy about going up to strangers and asking for a jump start. I know what I'm doing; I tell them they can stay in the car. But this machine eliminates the need to make new friend. I bought it (at Home Depot, $99.97) when my spare car's battery started acting up.
OK, but let's say you never leave your lights on, and your battery works just fine. Good. Have you ever woken up to find a flat tire ... without even enough tire pressure to get to the gas station? With the flip of a switch, old Orangey becomes an air compressor.
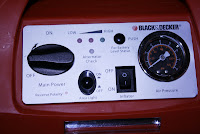 Say there's a power outage. How will you make coffee in the morning? This machine has two standard outlets, letting you use electricity even during a blackout or "rustic" camping trip. (I'm all for roughing it, but again, not without coffee, or an air compressor to blow up the mattress for my tent.) It even comes with needles for blowing up volleyballs and the like, and a DC power adapter (for things you would plug into a vehicle's cigarette lighter). There's even a compartment to store these accessories.
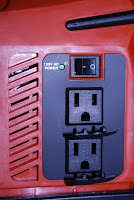 I haven't put the battery through the ringer -- yet -- but in my experience, it holds enough of a charge to get through several of these minor emergencies on one charge, and re-charges quickly, in less than three hours. At 16 inches, by 7 inches by 10 inches, it's compact enough to fit in any car's trunk.
You don't need an excuse to buy this jump box. Trust me, it'll come in handy. You can still make friends in parking lots, but instead of being the one holding jumper cables trying to look friendly/desperate/cute/trustworthy to strangers, you can be the one who saves the day.
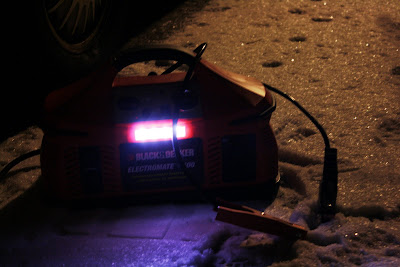

The Black & Decker Electromate 400 is an AC/DC portable power supply, jump starter and air compressor in one. And, it has a spotlight.
I'm not shy about going up to strangers and asking for a jump start. I know what I'm doing; I tell them they can stay in the car. But this machine eliminates the need to make new friend. I bought it (at Home Depot, $99.97) when my spare car's battery started acting up.
OK, but let's say you never leave your lights on, and your battery works just fine. Good. Have you ever woken up to find a flat tire ... without even enough tire pressure to get to the gas station? With the flip of a switch, old Orangey becomes an air compressor.
 Say there's a power outage. How will you make coffee in the morning? This machine has two standard outlets, letting you use electricity even during a blackout or "rustic" camping trip. (I'm all for roughing it, but again, not without coffee, or an air compressor to blow up the mattress for my tent.) It even comes with needles for blowing up volleyballs and the like, and a DC power adapter (for things you would plug into a vehicle's cigarette lighter). There's even a compartment to store these accessories.
 I haven't put the battery through the ringer -- yet -- but in my experience, it holds enough of a charge to get through several of these minor emergencies on one charge, and re-charges quickly, in less than three hours. At 16 inches, by 7 inches by 10 inches, it's compact enough to fit in any car's trunk.
You don't need an excuse to buy this jump box. Trust me, it'll come in handy. You can still make friends in parking lots, but instead of being the one holding jumper cables trying to look friendly/desperate/cute/trustworthy to strangers, you can be the one who saves the day.

Saturday, January 30, 2010
68 Degrees
Sixty-eight degrees. That's what the thermostat was set for at my parents' house, and if you ever tried to go near it, you'd get your fingers slapped. Cold? My mom had two solutions. Put on a sweatshirt, or do some work. And like all dads, mine said: "I'm not paying to heat the outside."
I'm comfortably sitting in a room just shy of 73 degrees, but I pay for it. My heating bill was $185 last month. I live in a drafty house.
Although the calendar says we're in the middle of winter, the newspaper says this February is going to be one of the coldest in 50 years. I'm going to try a little experiment. I installed shrinkwrap plastic sheets over my windows and will record how much money it saves.

I covered four windows, near where I feel the cold most. I used two different brands: W.J. Dennis & Company (on sale at Aco for $1.99, one box covers one window, 42 inches by 84 inches) and the 3M brand ($8.99 for a sheet that is twice as big).

Installation is quick. The only tool you need is a hairdryer.
So my investment is $13. If I save $13 on my next heating bill, I'll be converted.
I'm comfortably sitting in a room just shy of 73 degrees, but I pay for it. My heating bill was $185 last month. I live in a drafty house.
Although the calendar says we're in the middle of winter, the newspaper says this February is going to be one of the coldest in 50 years. I'm going to try a little experiment. I installed shrinkwrap plastic sheets over my windows and will record how much money it saves.
I covered four windows, near where I feel the cold most. I used two different brands: W.J. Dennis & Company (on sale at Aco for $1.99, one box covers one window, 42 inches by 84 inches) and the 3M brand ($8.99 for a sheet that is twice as big).

Installation is quick. The only tool you need is a hairdryer.
So my investment is $13. If I save $13 on my next heating bill, I'll be converted.
Wednesday, December 2, 2009
Plumbing Lessons One and Two
Well, now I know the difference between dirty water, and REALLY dirty water.
Lesson #1: What a whiz!
Every now and again I do an absent-minded load of laundry. I'll accidently leave something in the laundry tub so it overflows on the rinse cycle and get water all over the floor. I curse, then clean up the mess. No big deal.
A few days ago, I woke up to find a water spill in the basement from a different source: The pipe from the laundry tub drain had slipped off. Maybe the plastic washers wore out. At least it wasn't my fault.
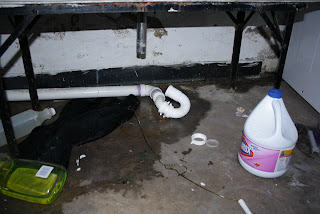
I fixed it that night after work and did two loads of laundry before bed.
First, I grabbed my spare plumbing parts (I have a small stash leftover from other jobs), pipe wrenches, teflon tape and my Ladies Tool Kit from the garage.
Plumbing is easy. You just have to look at it like a puzzle and see how things connect. You can cut pipes to fit, but you need the right size washers and such.
DO: When plumbing, it's important to do a "dry fit." Just loosely connect the pieces at first. You have to assemble things in a certain order and you want to make sure it all fits before tightening nuts or especially soddering.
My project was just a matter of connecting plastic drain pipes. When putting everything back together, I used new washers and slip nuts because I found the old ones were stretched or cracked.
DON'T: If you twist the plastic slip nut (or a toilet seat bolt, etc.) too hard, you can crack it and cause damage. Sometimes you can just twist them with you hand.

DO: Just get over the fact that the water is dirty. No matter where you're plumbing -- the kitchen sink, laundry room or bathroom) chances are you'll see or touch something disgusting or get splashed with dirty water (anything that goes down the drain, you don't wanna see again). That's the worst part. Just be careful.
DON'T:Dump a bucket of dirty water down the sink you just disconnected. Oops.
When I fit the pipes together, I wrapped teflon tape around the threads of the nuts. It helps create a good seal.
When I'm done with a plumbing job, I like to put newspapers under the pipes to 1) catch any drips; 2) help me discover if I have drips (the newspaper will either be wet or wrinkled if the water dried); and 3) let me know where the drips are coming from. (Please support your local newspapers.)
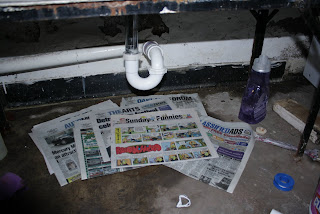
I did two loads of laundry and did not have any problems that night. I felt pretty good about it all.
Lesson #2: Not my duty!
A few days later, and another wet spot basement, coming from the sewer drain. It was just a little bit of water, with what looked to be dirt. But it drained back down quickly.
I thought it could be another laundry room issue. So I kept an eye on the drain when I did a load of wash. A little water gurgled out. Then someone flushed the toilet upstairs, and what happened next was really gross. That's REALLY dirty water. Now, you know the difference.
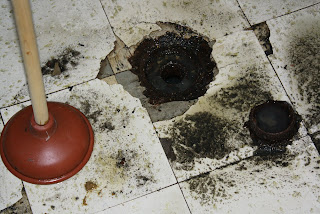
There was no time to investigate whether I could tool around and fix this. I called a local plumbing and sewer company, (who I chose based on a positive comment on the Internet). The plumber, Mitch, showed up an hour later. He sent coils with cutters on them down to the drain to clean the sewer lines of tree roots or other debris. The sewer opened. He was done with the work in less than an hour.
I was happy to find out the charge was only $125 considering the emergency nature of the task.
Mitch said we should be getting the sewer lines cleaned every two years as part of our general maintenance. That came as a surprise. I've lived at the house six years and never had it done, nor do I ever remember that ever happening at myparents' house growing up. Mitch also said there are things you shouldn't flush, such as cotton-based products, dental floss and even those "flushable" toilet cleaner heads. Toilet paper and waste, that's it.
I usually hesitate to call in the pros, but it was worth it, and I'm happy with the level of service.
Sometimes plumbing is a do-it-yourself job, and sometimes you should call the professionals. Sometimes you gotta go with #1 and sometimes you gotta go #2.
Lesson #1: What a whiz!
Every now and again I do an absent-minded load of laundry. I'll accidently leave something in the laundry tub so it overflows on the rinse cycle and get water all over the floor. I curse, then clean up the mess. No big deal.
A few days ago, I woke up to find a water spill in the basement from a different source: The pipe from the laundry tub drain had slipped off. Maybe the plastic washers wore out. At least it wasn't my fault.

I fixed it that night after work and did two loads of laundry before bed.
First, I grabbed my spare plumbing parts (I have a small stash leftover from other jobs), pipe wrenches, teflon tape and my Ladies Tool Kit from the garage.
Plumbing is easy. You just have to look at it like a puzzle and see how things connect. You can cut pipes to fit, but you need the right size washers and such.
DO: When plumbing, it's important to do a "dry fit." Just loosely connect the pieces at first. You have to assemble things in a certain order and you want to make sure it all fits before tightening nuts or especially soddering.
My project was just a matter of connecting plastic drain pipes. When putting everything back together, I used new washers and slip nuts because I found the old ones were stretched or cracked.
DON'T: If you twist the plastic slip nut (or a toilet seat bolt, etc.) too hard, you can crack it and cause damage. Sometimes you can just twist them with you hand.

DO: Just get over the fact that the water is dirty. No matter where you're plumbing -- the kitchen sink, laundry room or bathroom) chances are you'll see or touch something disgusting or get splashed with dirty water (anything that goes down the drain, you don't wanna see again). That's the worst part. Just be careful.
DON'T:Dump a bucket of dirty water down the sink you just disconnected. Oops.
When I fit the pipes together, I wrapped teflon tape around the threads of the nuts. It helps create a good seal.
When I'm done with a plumbing job, I like to put newspapers under the pipes to 1) catch any drips; 2) help me discover if I have drips (the newspaper will either be wet or wrinkled if the water dried); and 3) let me know where the drips are coming from. (Please support your local newspapers.)

I did two loads of laundry and did not have any problems that night. I felt pretty good about it all.
Lesson #2: Not my duty!
A few days later, and another wet spot basement, coming from the sewer drain. It was just a little bit of water, with what looked to be dirt. But it drained back down quickly.
I thought it could be another laundry room issue. So I kept an eye on the drain when I did a load of wash. A little water gurgled out. Then someone flushed the toilet upstairs, and what happened next was really gross. That's REALLY dirty water. Now, you know the difference.

There was no time to investigate whether I could tool around and fix this. I called a local plumbing and sewer company, (who I chose based on a positive comment on the Internet). The plumber, Mitch, showed up an hour later. He sent coils with cutters on them down to the drain to clean the sewer lines of tree roots or other debris. The sewer opened. He was done with the work in less than an hour.
I was happy to find out the charge was only $125 considering the emergency nature of the task.
Mitch said we should be getting the sewer lines cleaned every two years as part of our general maintenance. That came as a surprise. I've lived at the house six years and never had it done, nor do I ever remember that ever happening at myparents' house growing up. Mitch also said there are things you shouldn't flush, such as cotton-based products, dental floss and even those "flushable" toilet cleaner heads. Toilet paper and waste, that's it.
I usually hesitate to call in the pros, but it was worth it, and I'm happy with the level of service.
Sometimes plumbing is a do-it-yourself job, and sometimes you should call the professionals. Sometimes you gotta go with #1 and sometimes you gotta go #2.
Thursday, October 15, 2009
Top shelf
Checking an item off the mental to-do list doesn't always have to turn into a major project.
I have imagined building shelf on shallow alcove of my dining room area. I've drawn dimensional diagrams and thought about how I'd see it standing and sitting. I've pondered the type of wood I would use and whether this shelf would just get full of clutter anyway.
At her cottage, my grandma-in-law has a bunch of lumber that her late husband bought when he had intended to put up some shelves near the dining area there. He became unable to do it, so the boards got shoved under beds.
Grandma wanted someplace to stack her cookbooks and Dick Francis mysteries. She wanted two simple shelves. It gave me great pleasure to hang them.
I used twelve screws and needed three tools. It took me about an hour. But I stayed for the whole weekend. It's a cottage on the lake.

The next day, I realized I'd need to add bookends, so I used a handsaw to cut four from a 2-by-8-inch slat and nailed them in place. After I left, Grandma stained them, and e-mailed to say how happy she was.
The point is, she has shelves, and I got something done, even if it isn't for my own house.
I have visions of many things: New paint for the living room, pegboard for the garage, a privacy fence panel. I have an old pie cabinet that I picked up in the trash two years ago, sitting in my garage, just waiting for a bit of finish.
These shelves aren't perfect. They're simple and functional, and they remind me that it's better to do something than think about getting it all done to perfection.
I have imagined building shelf on shallow alcove of my dining room area. I've drawn dimensional diagrams and thought about how I'd see it standing and sitting. I've pondered the type of wood I would use and whether this shelf would just get full of clutter anyway.
At her cottage, my grandma-in-law has a bunch of lumber that her late husband bought when he had intended to put up some shelves near the dining area there. He became unable to do it, so the boards got shoved under beds.
Grandma wanted someplace to stack her cookbooks and Dick Francis mysteries. She wanted two simple shelves. It gave me great pleasure to hang them.
I used twelve screws and needed three tools. It took me about an hour. But I stayed for the whole weekend. It's a cottage on the lake.

The next day, I realized I'd need to add bookends, so I used a handsaw to cut four from a 2-by-8-inch slat and nailed them in place. After I left, Grandma stained them, and e-mailed to say how happy she was.
The point is, she has shelves, and I got something done, even if it isn't for my own house.
I have visions of many things: New paint for the living room, pegboard for the garage, a privacy fence panel. I have an old pie cabinet that I picked up in the trash two years ago, sitting in my garage, just waiting for a bit of finish.
These shelves aren't perfect. They're simple and functional, and they remind me that it's better to do something than think about getting it all done to perfection.
Wednesday, August 26, 2009
Removing a stripped screw
 I recently learned the trick to removing a stripped screw. I had a stripped screw on the half wall by my kitchen, which the old homeowners had used as a hook for the phone. I didn't need it there.
Use a hacksaw to create a slot.
 Then use a regular blade screwdriver.
 That was easy.
Monday, August 17, 2009
Hand of a Woman

Thought I'd vacuum my car today, but I had another job coming. I don't know much about automotive mechanics, so here's the quick and dirty version:
I walked out to the driveway to see my car had leaked anti-freeze all over the driveway. Gallons. Turns out, I had a broken radiator drain cock. (See, I told you it was dirty.)
My aforementioned, knowledgeable Dad (who taught me everything I know about tools) and brother Bill (who helped me with the mortar project last week) came to my rescue again. We took out the radiator, pulled out the broken drain plug, replaced it with a new one, poured in some anti-freeze and bingo-bango, the car works again. The part only cost $5, and the anti-freeze was on sale.
Bonus: We spread some of the mortar powder on the driveway to soak up the spilled fluids.
I took this picture, which I call Hand of a Woman. I try to be independent. I don't always call my dad to help when any little thing goes wrong, but it is so nice that he is there. And I have the sweetest brothers, too.
Friday, August 14, 2009
Garage, Part 1: Mortar
 The cornerstone of a good garage is a good cornerstone. And I had trouble in that department.
The cinderblock at the back corner of my garage became loose to the point where I could pull it out with my hands.
 I could see this was a do-it-yourself job. But I did not do it myself. I called in my dad and brother Bill. Dad brought the knowledge and a box of tools. Bill brought the laughs.
Before mixing mortar, we prepared the surface. Crumbling bits of the old mortar were chiseled from the loose brick and the rest of the wall nearby. Then the area was cleaned with a wire brush and sprayed with the hose.
We mixed a small batch of Quickrete mortar from an 80-pound bag ($4.47 from Home
 Depot). The product bag (and my dad) suggest adding a little water at a time, letting the powder absorb the liquid. Fold the mixture until you don’t see any more dry powder. Then plop the mud until you have a good consistency. It shouldn’t be crumbly (too dry), but be careful not to add too much water; it will make the mortar weak.
“When you think it’s too dry, it’s probably ready,” my dad advised. He also at one point told me I needed to add “a shot glass” more water -- as if that’s the only unit of measurement I know.
 We spread a layer of mortar on the bottom of the surface before sliding the brick in place using metal dowels, which were later removed. Then we grabbed trowels and mortar boards and spent a good deal of time shoving mortar into cracks. It was about as glamorous as it sounds.
 My neglected garage needed a lot of patching. We went through 120 pounds of mortar that day, mixing small batches at a time so the mortar wouldn’t dry out in the sun.
The final step is to take a tool called a rake to scoop the excess mortar along the joint to form a nice curve. After the mortar is dry, rub a wire brush over it to remove any loose pieces. Then you’re ready to paint. Which I’ll do. Soon.

Tuesday, July 14, 2009
The Miracle Mallet
Since receiving my Ladies Tool Kit as a hand-me-down gift nine years ago, I have found it to be indispensable. The slim case fits easily under the kitchen sink; there's no need to run to the garage or basement looking for needle-nose pliers or a screwdriver. I'll write more about this handy tool set later. But needless to say, it can't solve all my woes.
On a camping trip last summer, I had to pitch my tent on rock hard soil. Normally, I find a rock and use that to pound in the stakes -- the way the cavemen did it. But the ground was having none of that. I tried the 16-ounce hammer from my ever-present Ladies Tool set, and even that didn't do the trick. I was not a happy camper.
Out of desperation, I dug around the trunk of my Cadillac. I don't know what I was hoping to find ... a tire iron, maybe? I pulled out a dead blow rubber mallet. The very tool I needed, at the precise time I needed it. This was a used car I bought five months prior, and I'd never seen this mallet before it ended up in my hand that day.

I called it a miracle mallet because it saved the day. When I packed up camp, I rolled the mallet in with the tent so I shall never have the same problem again. Here's to small miracles.
On a camping trip last summer, I had to pitch my tent on rock hard soil. Normally, I find a rock and use that to pound in the stakes -- the way the cavemen did it. But the ground was having none of that. I tried the 16-ounce hammer from my ever-present Ladies Tool set, and even that didn't do the trick. I was not a happy camper.
Out of desperation, I dug around the trunk of my Cadillac. I don't know what I was hoping to find ... a tire iron, maybe? I pulled out a dead blow rubber mallet. The very tool I needed, at the precise time I needed it. This was a used car I bought five months prior, and I'd never seen this mallet before it ended up in my hand that day.
I called it a miracle mallet because it saved the day. When I packed up camp, I rolled the mallet in with the tent so I shall never have the same problem again. Here's to small miracles.
Friday, June 19, 2009
Bonding experience
My mother-in-law's undies were falling out of her drawers!
I helped her fix the problem.
Pam, my mother-in-law, told me about her 30-year-old dresser that was falling apart. She'd glued it several times, but nothing seemed to work. I asked if she had tried Gorilla Glue, and the answer was no. She had turned to duct tape as a last resort. Armed with two bar clamps and Gorilla Glue, I made a house call. First, we unraveled the duct tape.
Using a razor blade, I chipped off layers of dried glue and broken particle board from inside the grooves. We dry fit the warped pieces together. It took some hammering. Talk about super glue -- Gorilla Glue ($4.99 for two ounces) works wonders! You have to dampen one end of what you're gluing and then spread a thin (thin!) line of glue where you need it. I used a toothpick to spread the glue inside the grooves. The glue expands and becomes white when it cures.
To hold the drawer together while the glue set, I used 36-inch bar clamps, which I bought for $13 each. I put a piece of scrap wood between the clamp and the drawer facing so the wood wouldn't be damaged from the pressure. In 30 minutes, the glue was dry, and the drawer was ready to go back in the dresser.
I had used the same method to fix my kitchen utensils drawer. I know how annoying it can be to pull open a drawer and have it fall apart, so I was happy to help Pam fix hers.
You could say it was a bonding experience for us as well.
Thursday, May 28, 2009
Welcome
If there's one thing I like more than finishing a project, it's starting one. I'm not afraid to take something apart and troubleshoot it, as long as I think I can get it back together. I've had successes:
- I replaced the rollers in my 25-year-old, hand-me-down dryer.
- I installed a new bathroom sink.
- I doubled the counterspace in my tiny kitchen by building a microwave shelf, and it's still hanging.
- I replaced broken ceramic tiles on the steps leading to the kitchen (so what if it was two years after I first bought the tile saw).
I haven't had any failures (just projects I haven't completed yet).
This is where you'll find me, tooling around with home repairs.
Subscribe to:
Posts (Atom)